DIY Solar Panel Installation
Installing solar panels may seem like a straightforward task that involves attaching panels to your roof, but it’s important to recognize that a do-it-yourself (DIY) solar panel installation is not always as simple as it appears.
Therefore, before embarking on a DIY solar panel installation project, it’s important to look at some important points:
Let’s explore it: The Pros And The Cons of DIY Solar Panels
Before embarking on a DIY solar panel installation, it’s important to carefully evaluate the potential advantages and drawbacks. While a DIY approach may be less expensive than hiring a professional solar company, it still involves significant expenses and commitment.
To help you determine if a DIY solar installation is a right choice for your situation, here are some potential pros and cons to consider:
Pros: Cost Savings
One of the main advantages of installing a solar power system yourself is the potential for significant cost savings by avoiding the need to hire a third-party solar installer. By designing a solar panel system that meets your home’s electricity demands, you can reduce your upfront installation expenses.
Pros: More Control
DIY is an ideal choice for those who desire total control over their home renovation initiatives. Since you are not constrained by the options provided by a third-party provider, a DIY installation lets you select any solar panels and equipment you like. Additionally, several steps in the solar installation process can be customised to fit your unique requirements, timing, or preferences. If you want to construct your ground mount, for instance, you can do so, but it’s important to feel at ease talking with municipal officials, financial planners, electricians, and tax accountants.
Pros: More Convenience
A DIY solar panel installation can be more convenient in various ways.
Firstly, you have the flexibility to design a unique setup for your panels, reflecting your specific requirements and preferences.
Secondly, you are not bound to wait for the work schedules of a third-party installer, and can instead work on your solar installation project at your convenience.
Moreover, DIY solar panels can also be more convenient when it comes to powering smaller off-grid structures.
Con: It’s a lot of time and effort
Installing a solar power system yourself can be a highly rewarding experience, but only if you’re up for a serious challenge. However, if you have limited experience with DIY projects and are only familiar with putting together furniture, it might be best to avoid attempting a solar installation. Not only does it require a lot of planning and organizational skills, but it also demands a significant amount of time and effort. From initial design to final connection, a DIY solar project can take anywhere from one to four months to complete.
Con: Risk of Roof Damage or Leaks
One of the biggest risks of a DIY solar installation is potential damage to your roof. This is especially true if your roof isn’t flat, as installation requires drilling numerous holes into it. Drilling into the wrong spot could cause serious structural damage, and improper sealing and flashing could lead to roof leaks and even mold issues.
Furthermore, installing solar panels yourself is likely to void your roof’s warranty, meaning that you’ll have to cover any repair costs if anything goes wrong. This is an important factor to consider before attempting a DIY solar project.
Con: Safety Concerns
When it comes to a DIY solar installation, there are two significant safety risks to consider: heights and high-voltage electricity.
Working on a roof means you’ll be at a height, which poses a danger of falls and injuries. Additionally, solar installations require working with high-voltage electrical wiring, which can cause severe injuries or even death if not handled properly.
Even after the installation, if there are any issues with the panels over their 25-year lifespan, you’ll have to climb back onto the roof to troubleshoot them yourself.
And the most alarming risk is that improper wiring could lead to a fire on your rooftop system, putting you and your property in danger.
Con: No Professional Support for Faults or Warranty Claims
One downside of DIY solar installations is the lack of professional support for equipment faults or warranty claims. While you can still contact the manufacturer directly, it can be challenging to prove a warranty claim without professional documentation of the installation process.
Additionally, improper installation can void the warranty altogether. So, if any issues arise, it will be up to you to troubleshoot and resolve them. This can be a frustrating and time-consuming process, especially if you do not have prior experience with solar equipment.
Cons: Limitations in claiming incentives
One disadvantage of a DIY solar installation is that you may not be eligible for certain incentives and rebates that are only available to those who use certified solar companies. It’s important to research the incentives and rebates that are available in your area and determine whether a DIY installation would affect your ability to claim them.
Pre-Steps of DIY Installation Guide
Calculate Your Electricity Consumption
By reviewing your bill, you can determine your monthly energy consumption in kilowatt-hours (kWh). This information will help you determine the appropriate size of solar energy system you need to generate the required amount of electricity.
It’s recommended that you calculate this value accurately by checking the average monthly energy consumption over the last 12 months.
Site Analysis
An essential aspect of solar panel installation is conducting a site inspection or search to determine a suitable location. The selected site should be properly oriented towards the sun and located at an appropriate height or on flat terrain. This step is crucial to ensure the optimal functioning of solar panels.
Select the Right Solar Panels and other components
Selecting the appropriate solar panel model can significantly impact the outcome. The available solar panel models and their costs differ based on the customer’s objectives, the intended investment, and the manufacturer. It’s recommended to begin by estimating the necessary expenses and potential savings. Opt for a reputable brand that provides the most suitable option for your venture, enabling you to personalize the design to fit various settings.
Learn About Technical & Feasibility Study
A technical and feasibility study is necessary before proceeding with the installation of a photovoltaic system. The study evaluates the building’s structure and determines the appropriate type of equipment based on the energy consumption profile. Factors such as the number of people and electrical appliances used are also considered. The study takes into account the solar radiation characteristics of the installation site, which vary depending on the geographic location. Based on the study results, technical experts can recommend the optimal equipment to meet the owner’s objectives and budget for procurement.
Doing Budget Calculation
By referring to your monthly energy consumption as indicated on your electricity bill, you can estimate the expenses involved in setting up solar power at your residence or workplace. It is feasible to compute the approximate cost for the installation of solar panels based on your energy consumption. It is important to factor in the warranty, maintenance expenses, and the number of panels that will be needed during the installation process.
All Steps of DIY Solar Installation
Installing solar panels is an easy process that can be broken down into several simple steps:
Step 1: Deciding the direction & Angle of the Solar Panel installation
To ensure maximum sunlight exposure, the ideal direction to face solar panels is south. However, solar panels can also be installed facing east or west, which can still provide good results. It’s important to avoid facing solar panels towards the north.
When installing solar panels, it’s important to consider the tilt angle, which is the angle between the solar module and the horizontal ground. The optimal tilt angle for solar panels is determined by the latitude of your location.
To further increase conversion efficiency, you can also use a solar tracker. This technology allows the panels to follow the sun’s movement throughout the day, optimizing the amount of sunlight they receive.
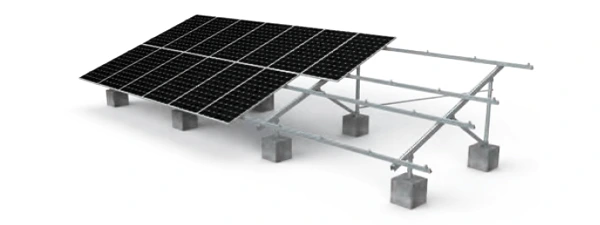
Step 2: Installing Solar Mounting Structure
The Solar Mounting Structure serves as a support system for fixing solar panels securely onto the ground or rooftop. When installing solar panels, one crucial element to consider is the solar mounting structure. This structure serves as the foundation for the solar panels, holding them securely in place and protecting them from environmental factors such as wind, rain, and snow. Here’s what you need to know about solar mounting structures:
Types of Solar Mounting Structures There are three main types of solar mounting structures: roof mounts, ground mounts, and pole mounts.

Step 3: Assembling the Panels
After ensuring that the solar mounting structure is fixed accurately, the next step is to connect the solar modules to it. It’s important to make sure that all nuts and bolts of the solar modules are securely fastened to the solar structure. This ensures that the panels are properly secured and will last for a long time.
Step 4: Wiring for Electricity
Once the solar panels are assembled, MC4 connectors are used to connect them. These connectors are universal and can be used with any type of solar panel, simplifying and speeding up the wiring process for the solar array.
For a series connection, the positive wire from one module is connected to the negative wire of another module. In a parallel connection, the positive wires are connected and the negative wires are connected. A parallel connection maintains the voltage of each panel, while a series connection increases the voltage to match that of the battery bank.
Step 5: Connecting the Solar Panels to the Inverter
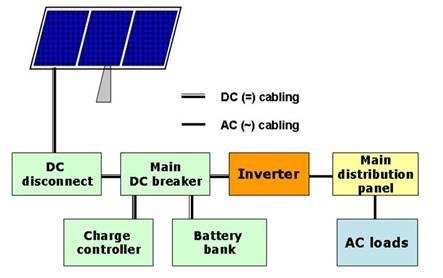
Once the wiring is in place, it’s time to connect the panels to the inverter. The inverter converts the DC electricity produced by the panels into AC electricity that can be used in your home. Most inverters have terminals where you can connect the wires from the panels.
Step 6: Connecting the Inverter to the Battery
If you plan to use a battery to store excess energy produced by your solar panels, you’ll need to connect the inverter to the battery. (only in off-grid systems)

Step 7: Connecting the Inverter to the Grid
To connect the inverter to the grid, plug it into the main power switchboard, which will supply power from the grid. Connect the output wire to the board that supplies electricity to your home. To accurately measure the excess energy generated by your solar system, you’ll need to install a metering device. Connect the positive wire from the metering device to the line terminal and the negative wire to the neutral terminal of the inverter. This will allow you to monitor the amount of energy your solar system generates and track your savings on your energy bill.
Step 8: Starting the Inverter with Solar Panels and Grid
Starting the inverter with solar panels and grid Once everything is connected, it’s time to turn on the inverter and start producing clean energy from your solar panels. Make sure to monitor your system’s performance and consult a professional if you encounter any issues.
Read More:- Top 7 Solar Power Plants Around the World


